29mm Priority Cinco
The 29mm Priority Cinco is a
companion to the 29mm Priority Stealth which is made from a
used, U.S. Postal Service Priority Mail corrugated cardboard
box. A clean pizza box would work just as well.
Despite it's apparent simplicity, this is not a beginner's project. Great care must be taken when building it to ensure safe and reliable flights.
The basic Cinco design, regardless of size, consists of three pieces, a top, a bottom and a motor mount. The top and bottom consist of 5 equilateral triangles with cutouts at their apexes for the motor mount and launch rod. The motor mount is a 5 sided tube long enough to go from the bottom to the top with a little length to spare. The �diameter� of the tube is just slightly undersized so the motor will fit snugly and not fall out during flight.
The 29mm Cinco uses equilateral triangles that are 6.5 inches on a side. The motor mount is 5 inches long with sides that are 7/8 inches wide.
Final Assembly
Limitation
of Liability: Model rockets are not toys. Model rockets are
functional rockets constructed of lightweight materials and
launched using certified model rocket motors in accordance
with the NAR Model Rocket Safety Code. Model rockets, if
misused, can cause injury, property damage and even death. Art
Applewhite Rockets certifies that it has exercised reasonable
care in the design and manufacture of its products. Once sold,
we cannot assume any liability for product storage,
transportation or usage. Art Applewhite Rockets shall not be
held responsible for any property damage or personal injury
whatsoever arising from the handling, storage, use or misuse
of our product. The buyer assumes all risks and liabilities
there from and accepts and uses Art Applewhite Rockets
products on these conditions.
The
products on this website are copyright protected. Despite it's apparent simplicity, this is not a beginner's project. Great care must be taken when building it to ensure safe and reliable flights.
The basic Cinco design, regardless of size, consists of three pieces, a top, a bottom and a motor mount. The top and bottom consist of 5 equilateral triangles with cutouts at their apexes for the motor mount and launch rod. The motor mount is a 5 sided tube long enough to go from the bottom to the top with a little length to spare. The �diameter� of the tube is just slightly undersized so the motor will fit snugly and not fall out during flight.
The 29mm Cinco uses equilateral triangles that are 6.5 inches on a side. The motor mount is 5 inches long with sides that are 7/8 inches wide.
Materials
Two � Pieces of thin (about 1/16� thick) corrugated cardboard a minimum of 13 inches by 11.25 inches
One 5 inch square of thin corrugated cardboard
White glue, masking tape. Optional: super glue, packing tape
Tools: Razor knife, Ruler, Pencil
Download: Templates
Two � Pieces of thin (about 1/16� thick) corrugated cardboard a minimum of 13 inches by 11.25 inches
One 5 inch square of thin corrugated cardboard
White glue, masking tape. Optional: super glue, packing tape
Tools: Razor knife, Ruler, Pencil
Download: Templates
| Motor Mount |
| 1. Start by printing on
bond paper and cutting them out. Be sure to
print �actual size�. The motor mount should be
exactly 5 inches wide and the long side of the top
and bottom template should be exact 6.5 inches. 2. Glue the motor mount template to a piece of thin corrugated cardboard with the long (5 inch) side lined-up with the corrugations. 3. Light crease the cardboard along the dashed lines using a ruler and your thumb nail. 4. Cut out the motor mount along the solid lines. 5. Carefully fold along the dashed lines to form a 5-sided tube. 6. Glue along the seam and tape to hold until glue is dry. |
  |
| Top |
| 7. Cut out the template for the top and
bottom. (Optional) Gluing the template to a
piece of cardboard will make it easier to use. 8. Lay the template at the bottom center of one of the large (13"x11.25") pieces of cardboard. 9. Trace the outline of the template on the cardboard including the launch rod hole. 10. Rotate the template and line it up with the outline you just made. 11. Trace the outline of the template but without the launch rod hole. 12. Repeat until you have 5 sides drawn on the cardboard. |
  |
| 13. Cut out the top along the the outer
lines. 14. Crease the inside lines and fold the top into a short, five-sided pyramid. 15. Glue the two open sides together. Use masking tape to hold the sides together until the glue is dry. |
  |
  |
| Bottom |
| 16. The bottom is a little more
complicated, so read the instructions carefully and
look at all the illustrations before beginning. 17. Draw the bottom on the other piece of cardboard in the same way you did the top except include the dashed fold line indicated on the template. 18. Cut out the bottom pattern. |
  |
| 19. Cut on the lines between the
outside corners and the (blue) dashed line. 20. Crease and make mountain folds on the (red) radial lines going from the center to the outside corners. 21. Crease and make valley folds on the (blue) dashed lines. 22. Glue the (green) free edges together from the center to the dashed lines. Use tape to hold in place until the glue dries. 23. The bottom should look like a shorter version of the top with a trapezoidal �tab� coming out of each of the 5 sides |
 |
  |
| 24. Dry fit the bottom into the top. 25. Make sure the launch rod holes line up and all the outer edges in the top and bottom line up with each other. 26. Spread a thin layer of glue on each of the 5 trapezoidal tabs on the bottom. |
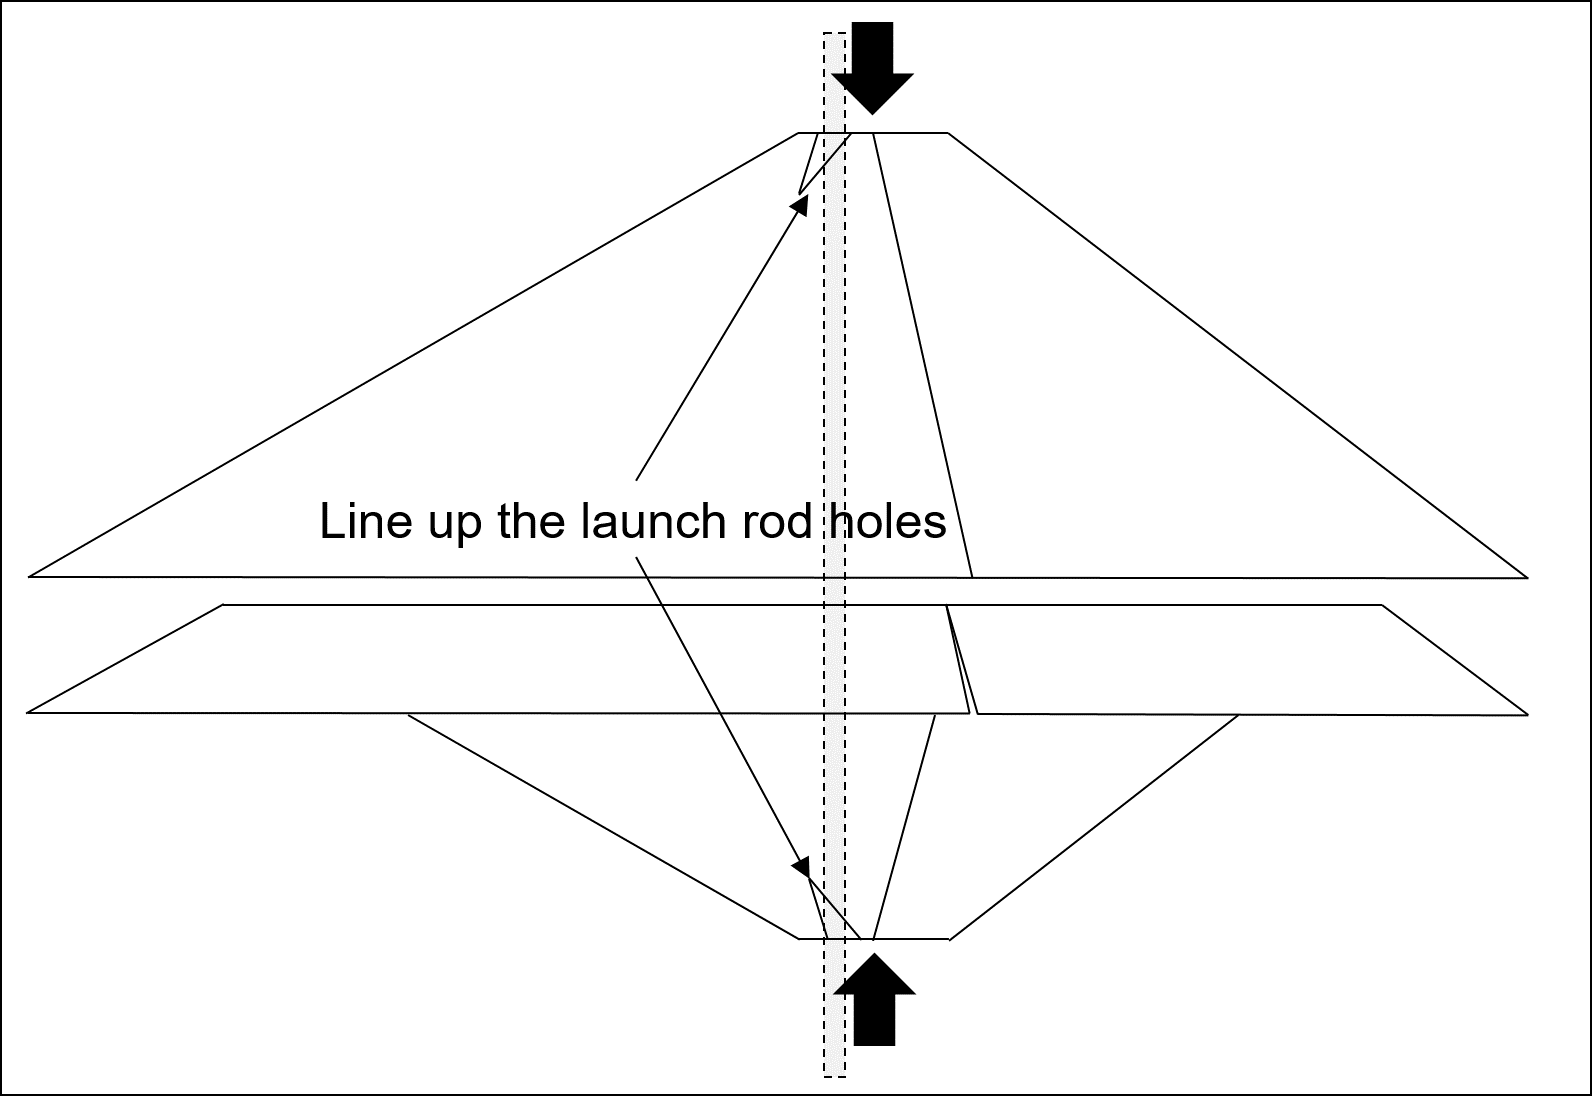 |
| 27. Press the bottom firmly into the top making sure the launch rod holes line up from top to bottom and all the outside edges line up. All the tabs on the bottom should lay flat against the underside of the top. |
 |
| 28. Push the motor mount into the
5-sided hole in the bottom and slide it up into the
top until it sticks out about 1/8 inch. It will
be a tight fit. 29. Put a line of glue along the five sides of the joint between the the motor mount and the top. 30. Put a line of glue along the five sides of the joint between the motor mount and the bottom. 31. Allow the glue a full day to dry. 32. (Optional) To make the motor mount stiffer and last longer you can soak the ends with thin super glue. 33. (Optional) To prevent moisture from the air making the cardboard soft, coat the outside of the Cinco with a clear acrylic spray paint. 34. (Optional) A piece of packing tape along the glue seam on the top and bottom will strengthen the rocket and make it last longer. |
 |
| Launch preparation is
simple. Insert a 29mm motor into the motor
mount. It should be a snug fit. Safety notes: Only use 29mm motors with between 20 and 100 Newtons of average thrust and and less than 120 Newton-seconds of peak thrust. Do not use a motor adapter because most adapter designs will not provide good motor retention. If possible, remove the ejection charge from the motor to prevent a possible fire hazzard. Be Safe and Good Luck! |
Copying, cloning and any other reproduction is strictly prohibited without permission from
Art Applewhite Rockets
Copyright � 2019